General Information
This document is a user manual for an already built OpenAutoLab. If you want to build the machine, refer to the Build Instructions chapter.
If you are new to film development, there is some basic information in this manual, but please note that it is not the complete knowledge base. Please read the documentation on films and chemicals before using them.
OpenAutoLab is a machine designed to simplify the film developing process. It pumps necessary chemicals into developing tank, agitates the film properly for the correct amount of time, pumps the chemicals back, washes the film and does all of that without the help of the user. The user has to load the film into the tank, pour the chemicals into their vessels, connect to the source of clean water and drain for waste water, start the program, wait for the end of the program and dry the developed film. The machine can be used in tempertaure-controlled water bath to achieve good results in color processing or without one if temperature precision is not critical.
Disclaimer
I do not take any responsibility for any damage done by mishandling chemicals.
For most processes rubber gloves suffice to keep you safe, but please refer to documents provided with each chemical you use, some are more toxic than others. This document explains the details of using the machine itself, without much attention towards the handling of chemicals. Research online if you are unsure, use your brain and be safe.
Machine components and operation overview
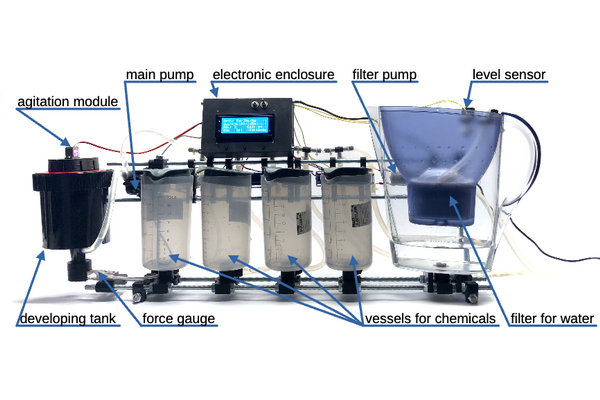
Developing tank is a special light-tight container, that allows the liquids to be pumped into and from it, while keeping the film in complete darkness. The film should be loaded into the tank also in darkness and is not allowed to be exposed to the light until the end of the development. The main pump moves liquid from the vessel into the tank through the valve, which is defined by the development process and is opened by the machine hardware electronically, and then pumps it back after defined amount of time.
The amount of the pumped liquid is controlled by the force gauge. The correct speed of the chemical reaction and its uniformity is achieved by agitation, i.e. rotation of film spiral inside of the tank with servo motor connected to agitating rod.
To avoid unwanted chemical reactions with minerals dissolved in tap water it is recommended to use distilled water instead, but in most cases tap water just passed through household filter don't leave significant impact on the picture quality, so the machine is build with such filter in mind. The water level on intake of the filter is kept high with the help of secondary pump powered through a float switch.
What does impact the final result are the water droplets left on film before drying: they can leave visible stains, which are residue of minerals that were dissolved in water. One possible solution to this is applying wetting agent on final wash, ideally dissolved in distilled water. Application of this wetting agent can be turned on in settings.
For some processes the chemicals anf film need to be stabilized at certain temperature. The machine was desidned with this in mind and its lower part is water-tight, so the user can submerge the vessels and the tank into water and keep it at desired temperature. For that a slow-cooker can be used (aka Sous Vide) or specialized film processing heater.
Praparation for film processing
Before processing any important film, especially if the machine was not in use for a long time, or after transportation, run an idle process without film, possibly with water instead of developing chemistry. For that I recommend entering service menu, filling all the vessels with clean water and running a cleaning cycle to make sure that all the valves are working and that everything is water-tight.
First of all you need to put the film in complete darkness onto the spiral inside of the developing tank. You can use the light-tight changing bag or the dark room. It needs to be completely dark, no red light is aceptable on this stage, even the tiniest amount of light getting into the room through the perimeter of the closed door can fog the film. If you can see the light, than the film can also "see" it.
Before doing it for real with the film you value, exercise putting the film onto the spiral first in daylight (use the already developed or ruined film strip), then exercise more with closed eyes, and then try the darkroom or changing bag, examining your work afterwards: the film loops should not touch each other and tank walls. Read the instructions of your developing tank or watch some videos on the internet on the topic if you need more information on loading.
Fill the vessels with chemicals. Study film development online a little if you are new. There are lots of different chemicals which are used for film developing, they should be stored and prepared differently, some of them are toxic, read the decumentation on your chemicals for exact instructions. The recommendation that I can give for beginners who did not buy any chemicals yet, is to start with black-and-white process in rodinal (aka r09) and fixing with literally any fixer in liquid form you can find (adofix, fomafix). Liquid concentrates are easy to measure and to mix with water, you just need a syringe and a couple of measuring cups.
Connect the intake of filter pump to water source: submerging the tube into 5l canister should do for developing one film. Turn on the clean water pump and make sure that some amount of water is filtered through: the machine is not going to wait if it needs prewash as the first step.
If you are developing color film or if you want to process black-and-white in higher than room temperature, use heated water bath. Submerge the machine into water-tight container filled with water and put temperature stabilized heater (slow cooker aka Sous Vide works perfectly for that purpose) set to wanted temperature into it.
Put the waste water output into another canister or put it directly into the sink. Make sure it does not run away during the pumping. After all preparation is done you can start the machine.
Initial screen
Agit: 30s/30s/5s
Wash:0x10m+3x5m+WA
B&W: 2    C41: 4
B&W   C41   Settings
On startup the machine shows overview of basic settings and gives the user a choice between developing processes and entering settings. First line shows the mode of agitation: duration of first agitation (directly after pumping each liquid into the tank), agitation period (time between consequent agitations) and agitation duration (length of each of those consequent agitations).
Second line shows the mode of film rinsing: number and duration of pre-washes, number of washes after development and if extra wash with wetting agent should be performed (if yes, letters WA appear on screen). Multiple pre-washes are necessary when developing cinema film with remjet: this remjet layer is first softened with hot stong basic solution and then can be washed away with water. Multiple rinses after development assures no fixer is left in film for archival storage. Wetting agent if needed should be poured into fourth vessel of the machine for both two- and three-stage processes.
Third line displays film count developed in current chemicals. It is important to keep track of it because of depletion: processing time for c41 is calculated from it and becomes longer as chemicals become weaker. For black and white this time recalculation is not implemented, it is expected that the user gives enters expected processing time before each development depending on film stock, developer type and dilution as well as depletion. The user can use one-shot developer like rodinal in which case there is no film count and the developer is pumped directly into waste water after use. More on that in settings.
The fourth line on this machine always depicts what pressing each of the buttons does. In this case you can start black-and-white or c41 developing process or enter global settings.
Black and white process
B&W developing
Film count: 2

Reset    +    Next >
If black-and-white process is chosen, and the developer is not one-shot (more on that in settings) you first land on film count page. Here you can reset the counter by pressing the first button or manually increment it by one with the second button. The incrementation is normally done automatically, so the manual option is added only if you have pressed reset by mistake and want to enter the correct value. The third button brings you to the next screen.
Developing time:
6:00

-      +      Next >
On the next screen you need to enter the development duration. The first button decraeses the time and the second one increases. Increments are not linear and increase as the value gets larger: small values have 5-seond steps, then 30 seconds, 5 minutes, 10 minutes, 30 minutes, 1 hour and 2 hours up to a maximal time of 42 hours. This is an obvious overkill for any standard processing, but can be useful in case you want to experimant with alternative processes (for example if using table salt as a fixer, some sources mention 24 hours as the correct fixing time)
Fixing time:
6:00

-      +      Next >
On the next screen you need to enter the duration of fixing. It works exactly like pre previous screen: the first button decraeses the time and the second one increases with the same exponential-like increment values. The third button starts the processing.
B&W develop    1/6
Developer   pump in

123.45       0:07
During pumping the chemicals into or from the tank the first line on the screen shows the name of the process, current substage index and the total number of substages (each rinse is counted as separate substage, so the user knows approximately how many processing stages are left). The second line shows the name of the substage and if the pump is working towards the tank or away from it. The last line shows the current value on the weight gauge and the total time passed from the processing start. Weight gauge shows negative numbers when the chemicals are pumped put (the weight of the tank decreases), and positive when the chemicals are pumped in. Nothing really changes if the tank is submerged into water of the heating bath: what is shown is the weight difference from the start, which buoyant force does not change. Important is not to change the water bath level during pumping and not to disturb the tank directly or by creating waves, because that can influence the measurements.
B&W develop    1/6
Developer   process
0:23 / 6:00
301.52       0:23
During the processing and agitation the screen shows the same information, but also additionally the time elapsed from the start of the substage and the duration of this substage on the third line. Not to be confuded with this substage timer is the process timer on the last line: it shows the time passed since the start of the film processing, not from the start of current stage in this multistaged process.
B&W develop    6/6
        Done
5:00 / 5:00
-312.64       28:30
When the processing is finished, the word "Done" appears on the second line of the screen and a sound signal brings users attention. You may now open the tank and get the film out for drying. Pressing any button will bring you to the initial screen.
C41 process
C41 developing
Film count: 2

Reset    +    Next >
If C41 process is chosen you land on film count page. Here you can reset the counter by pressing the first button or manually increment it by one with the second button. The incrementation is normally done automatically, so the manual option is added only if you have pressed reset by mistake and want to enter the correct value. The film count value is important as the chemicals become weaker with each development and the processing time is increased automatically. The third button starts the development.
B&W develop    1/10
Developer   process
0:23 / 3:15
301.52       0:23
The information on the screen as well as basic processing principles are the same as in black-and-white mode. The difference is only in number of chemicals involved and therefore number of substages.
Settings
Settings        1/10
Prewash duration
0:30
-      +      Next >
If on the main screen you chose to enter settings, the first page defines the duration of prewash. Prewash is important for bringing the film and the development tank to correct temperature before processing and for washing away antihalation layer. This duration is set up exactly the same way and to same values as processing durations. First and second buttons decrement and increment the value and the third one brings to the next screen.
Settings        2/10
Prewashes number:
1
-      +      Next >
Number of prewashing cycles at the beginning of processing. You can omit the step by setting the number to zero or you can use as many cycles as you wish up to 255.
Settings        3/10
Final washes duration:
5:00
-      +      Next >
Final wash is for getting rid of fixer traces trom the film, which is important for archival storage. This duration is set up exactly the same way and to same values as processing and prewash durations. First and second buttons decrement and increment the value and the third one brings to the next screen.
Settings        4/10
Final washes number:
3
-      +      Next >
Number of prewashing cycles in the end of processing. You set the number to as many cycles as you wish up to 255. Read the datasheet of your film to find the optimal number and duration of washes.
Settings        5/10
Apply wetting agent?
                 Yes
No     Yes    Next >
Wetting agent helps to reduce staining from non-distilled water. Third line shows the current value, first button sets to "No", second to "Yes" and the third updates the value and brings to the next page. If set to "Yes" than after the last rinse in water the machine will wash the film once more in the contents of the fourth vessel. As a wetting agent you may use commercial products like FotoFlo as well as DIY recipies such as droplet of soap in distilled water, glass cleaner for dishwashers and pure isopropil alcohol. Research online if you want to know more.
Settings        6/10
Initial agitation:
0:30
-      +      Next >
Duration of the first agitation performed directly after pumping the chemical into developing tank. This duration is set up exactly the same way and to same values as processing and wash durations. To set this value correctly as well as the next two, refer to film and developer datasheets.
Settings        7/10
Agitations period:
1:00
-      +      Next >
Time between two consequent agitations, to be more precice between the start of one agitation and the start of the next one.
Settings        8/10
Agitation duration:
0:05
-      +      Next >
For how long the servomotor performs each agitation (except for the first one which is usually longer).
Settings        9/10
Tank capacity:
300g
-      +      Next >
How much liquid should be pumped into the developing tank. Depends on the tank itself (some are wider than others) and type of film used (35mm film needs lower liquid level than 60mm medium format film). This value is also used for weight gauge calibration and for washing cycles (more on that topic in service menu.
Settings        10/10
Discard B&W dev?
                 Yes
No     Yes    Next >
Is the black-and-white developer one-shot, i.e. should it be discarded directly after use? If set to "Yes", the film counter does not show up and the used developer is pumped to waste after respective processing stage, not into its original vessel. Third line shows the current value, first button sets to "No", second to "Yes" and the third updates the value and brings to the next page.
Service menu
Some settings and functions are hidden in service menu, which can be accessed by pressing all 3 buttons simultaneously on startup. The motivation of keeping those separate is that they can mess up internal calibration or chemicals that are in the machine's vessels if the wrong button is pressed. If during startup all 3 buttons are pressed, you will see "Service menu" on the screen. Release the buttons immediately and you will see weight gauge calibration page. To calibrate the weight gauge you need to set it to zero by pressing the first button, then pour amount of liquid written on screen into developing tank (this amount can be changed in regular settings) and press the second button. If everything is done right the screen should show correct weight on the third line. To store new calibration values press the third button.
Next pages contain debug and test procedures. At the moment of release there is a program that fills all the vessels (and if needed also the tank) with water and a program that empties the vessels (if needed), fills them up with water and emties again. Use the first one and turn off the machine for some time to test that all interfaces are water tight. Use the second one as a cleaning cycle. I run the first program to fill the vessels and tank, add some basic cleaning solution in each of them and run the second program to rinse. Those programs are work in progress.